Bad Wheel Bearing Symptoms: How to Diagnose and Replace
Quick Answer
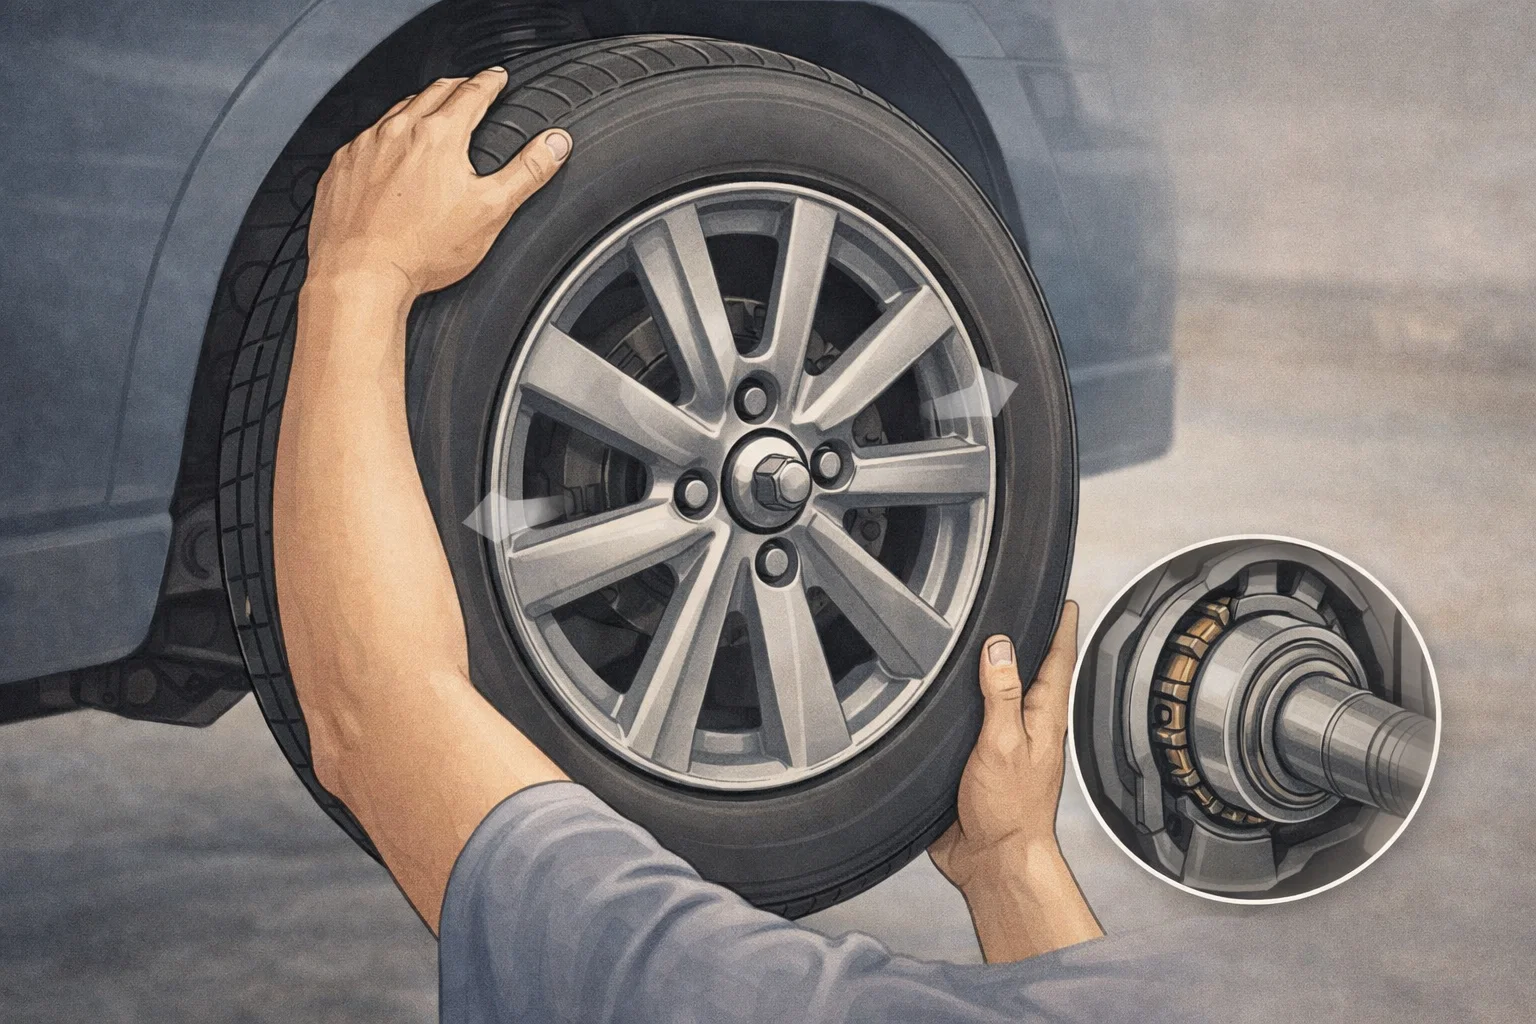
A bad wheel bearing produces a humming or growling noise that gets louder with speed and changes tone when you sway the steering wheel side to side. To confirm, jack up the suspect wheel and check for play by grabbing the tire at 12 and 6 oclock and rocking it. Any looseness or clunking means the bearing is worn. Hub-style bearings cost $40 to $120 per wheel in parts, and DIY replacement takes about 1.5 hours per side.
That Humming Noise Is Telling You Something Important
Wheel bearings are one of those parts you never think about until they start making noise. They allow your wheels to spin freely on the axle with minimal friction, supporting the entire weight of your vehicle while rotating thousands of times per minute. When they wear out, the first sign is almost always a noise: a low humming or droning sound that starts subtly and grows louder over weeks or months.
The challenge is that a bad wheel bearing sounds a lot like other issues, including worn tires, road noise, and drivetrain problems. This guide teaches you exactly how to tell the difference, pinpoint which wheel has the bad bearing, and decide whether to replace it yourself or take it to a shop. A shop charges $250 to $600 per wheel for this job. DIY parts cost $40 to $120, and the work takes about 1.5 hours per side on most vehicles with bolt-on hub assemblies.
This guide covers the five key symptoms, two simple diagnostic tests, the difference between hub-mounted and press-in bearings, and a complete replacement walkthrough.
A wheel bearing is a set of steel balls or rollers held inside a metal ring called a race. The bearing sits inside the wheel hub and allows the hub (and your wheel) to spin smoothly on the spindle or axle. Each wheel has its own bearing, and they support the full weight of the vehicle while handling road impacts, cornering forces, and braking loads. Modern sealed bearings are packed with grease at the factory and designed to last the life of the vehicle, but road conditions, potholes, and water intrusion can cause premature failure.
5 Symptoms of a Bad Wheel Bearing
Wheel bearing failure is gradual, which makes it easy to dismiss early symptoms. Here are the five signs to watch for, from most common to most severe:
- Humming or droning noise that increases with speed: This is the hallmark symptom. The noise sounds like a low hum or drone that increases in pitch and volume as you go faster. It is constant (not rhythmic like a tire noise) and does not change when you accelerate or decelerate. It often sounds like it is coming from the floor or the side of the vehicle.
- Noise changes when you sway the steering wheel: This is the easiest diagnostic clue. While driving at 40 to 50 mph on an empty road, gently sway the steering wheel left and right (enough to shift the vehicle weight, not a full lane change). If the noise gets louder when you sway one direction and quieter the other way, you have found the bad bearing. The noise gets louder when weight shifts onto the bad side.
- Play or looseness in the wheel: Jack up the suspect corner and grab the tire at the 12 and 6 oclock positions. Push and pull (rock the tire in and out). Any clunking or movement indicates a worn bearing. A tight, healthy bearing has zero play.
- ABS or traction control warning light: The wheel speed sensor is mounted on or near the wheel bearing hub. When the bearing develops excessive play, the sensor reads erratic signals, which triggers the ABS light. If your ABS light came on without an obvious brake issue, check the wheel bearings.
- Uneven tire wear: A bearing with play allows the wheel to wobble slightly, which wears the tire unevenly. If you notice cupping or scalloping on a tire (a wavy pattern across the tread), a bad bearing may be the root cause.
DO NOT DRIVE ON A SEVERELY WORN BEARING
A wheel bearing in the early humming stage can last hundreds or even a few thousand miles, but it will not improve on its own. A severely worn bearing (loud grinding, heat from the hub, visible play) is a safety hazard. In extreme cases, the bearing can seize, locking the wheel while driving, or the hub can separate from the spindle entirely. If the bearing is hot to the touch after driving or the noise is loud enough to hear over the radio, replace it immediately.
How to Diagnose Which Wheel Has the Bad Bearing
Test 1: The Sway Test (While Driving)
Drive at 40 to 50 mph on a straight, empty road. Gently sway the steering wheel to the left, holding for 2 to 3 seconds, then sway to the right. Listen carefully to the noise:
- If the noise gets louder when you sway left (loading the right side), the right wheel bearing is bad.
- If the noise gets louder when you sway right (loading the left side), the left wheel bearing is bad.
This works because swaying shifts the vehicle weight. The bad bearing makes more noise when it is carrying more load.
Test 2: The Jack Test (On the Ground)
Jack up the suspect corner and perform these two checks:
- Rock test: Grab the tire at 12 and 6 oclock. Push the top in and pull the bottom out, then reverse. Any clunking or play confirms a bad bearing. (Note: check that the ball joint is tight first, as a worn ball joint creates similar play.)
- Spin test: Spin the wheel by hand and listen for grinding, roughness, or rumbling. A healthy bearing is nearly silent. A worn bearing will sound rough or gritty.
Wheel Bearing Noise vs. Tire Noise
Bearing noise and tire noise are frequently confused. Here is how to tell them apart:
| Characteristic | Wheel Bearing | Tire Noise |
|---|---|---|
| Sound type | Constant hum or drone | Rhythmic whomp-whomp or whine |
| Changes with steering | Yes (louder on one side) | No (stays the same) |
| Changes with road surface | Minimal change | Loud on rough roads, quiet on smooth |
| Changes with speed | Gets louder proportionally | May come and go at certain speeds |
For more on tire-related noises and wear patterns, check our tire pressure guide and tire sidewall numbers guide.
Hub-Mounted vs. Press-In Bearings
How your bearing is replaced depends on the type your vehicle uses:
| Type | DIY Friendly? | Parts Cost | Details |
|---|---|---|---|
| Hub assembly (bolt-on) | Yes | $40-120 | The bearing, hub, and wheel speed sensor come as a single unit bolted to the knuckle with 3 to 4 bolts. Most common on modern trucks, SUVs, and many front-wheel-drive cars. |
| Press-in bearing | Difficult (needs a press) | $20-60 | The bearing is pressed into the steering knuckle. Removal and installation require a hydraulic press. Common on many compact and midsize cars. |
If your vehicle has bolt-on hub assemblies, this is a very manageable DIY job. If it has press-in bearings, you can remove the knuckle yourself and take it to a machine shop for pressing, which saves the labor cost of removing and reinstalling the knuckle.
Tools and Parts You Will Need
🔧 Tools
- Floor jack and jack stands
- Lug wrench or impact wrench
- Socket set (metric or SAE for your vehicle)
- Breaker bar
- Torque wrench
- Dead blow mallet or hammer
- Pry bar
- Penetrating oil (PB Blaster or equivalent)
- Wire brush
📦 Parts
- New wheel bearing hub assembly
- New axle nut (if applicable)
- New cotter pin (if applicable)
- Anti-seize compound
SOAK BOLTS THE NIGHT BEFORE
Hub bearing bolts are exposed to road salt, water, and debris for tens of thousands of miles. They are almost always corroded. Spray penetrating oil on the hub mounting bolts the night before you plan to do the job. This single step can save you an hour of fighting seized fasteners. Repeat the application the morning of the job for best results.
Step-by-Step Wheel Bearing Replacement (Hub Assembly)
This procedure covers bolt-on hub assembly replacement, which is the most common and DIY-friendly type. If your vehicle has press-in bearings, follow the knuckle removal steps and bring the knuckle to a machine shop for pressing.
Lift and Secure the Vehicle
Loosen the lug nuts while the car is on the ground. Jack up the vehicle and place it securely on jack stands. Remove the wheel. If your vehicle has a cotter pin and castle nut securing the axle, remove the cotter pin and loosen the axle nut now.
Remove the Brake Caliper and Rotor
Remove the caliper mounting bolts and hang the caliper from the suspension with a wire hanger. Remove the caliper bracket bolts. Slide the brake rotor off the hub. This exposes the hub assembly and its mounting bolts on the back of the knuckle.
Disconnect the ABS Sensor
Unplug the wheel speed sensor (ABS sensor) wiring connector. Trace the wire to its clip or bracket on the knuckle or strut and release it. On most hub assemblies, the sensor is built into the hub, so it comes out with the old unit. Be careful not to damage the connector or wiring harness.
Remove the Hub Mounting Bolts
The hub is typically held to the knuckle by 3 to 4 bolts accessed from behind the knuckle. These bolts are often extremely corroded. Use a breaker bar and the correct socket. If a bolt will not budge, apply more penetrating oil and wait 10 minutes. In worst cases, you may need to use heat from a propane torch (keeping it away from brake lines and CV boots).
Remove the Old Hub Assembly
With the bolts out, the hub should slide off the knuckle. If it is seized from corrosion, tap it from behind with a dead blow mallet. You can also thread two of the mounting bolts into the hub from the front side and use them as push-bolts to break the hub free. Clean the knuckle bore with a wire brush and apply anti-seize to prevent the new hub from seizing in the future.
Install the New Hub Assembly
Slide the new hub assembly into the knuckle bore. Start all mounting bolts by hand to ensure they thread correctly. Torque the hub bolts to the specification in your service manual (typically 75 to 100 ft-lbs). Connect the ABS sensor wiring connector and secure the wire in its clips.
Reinstall Brakes and Wheel
Slide the brake rotor back onto the hub. Reinstall the caliper bracket and caliper, torquing all bolts to spec. Mount the wheel and hand-tighten lug nuts in a star pattern. Lower the vehicle and torque the lug nuts to spec. Pump the brake pedal several times to seat the pads against the rotor before driving.
DIY vs. Shop Cost Comparison
| Cost Category | DIY | Shop |
|---|---|---|
| Hub assembly (one side) | $40-120 | $60-160 |
| Labor | $0 (your time) | $150-350 |
| Misc (anti-seize, penetrating oil) | $5-10 | Included |
| Total per side | $45-130 | $210-510 |
Wheel bearings usually fail one at a time, but if you have high mileage (over 100,000 miles) and one bearing has failed, the other side is likely not far behind. Some DIYers choose to replace both sides at the same time to save the hassle of doing the job twice.
If you noticed the noise during braking or it came with a pulsating brake pedal, the issue may involve your rotors as well. Our brake rotor replacement guide covers rotor inspection and replacement. For related suspension noises, see our suspension problems guide and shocks vs struts guide.
What to Read Next
Frequently Asked Questions
Don't Miss Critical Car Care Tips
Get exclusive guides, money-saving maintenance tips, and early warning signs delivered straight to your inbox.