How to Wash and Wax Your Car Like a Pro
Quick Answer
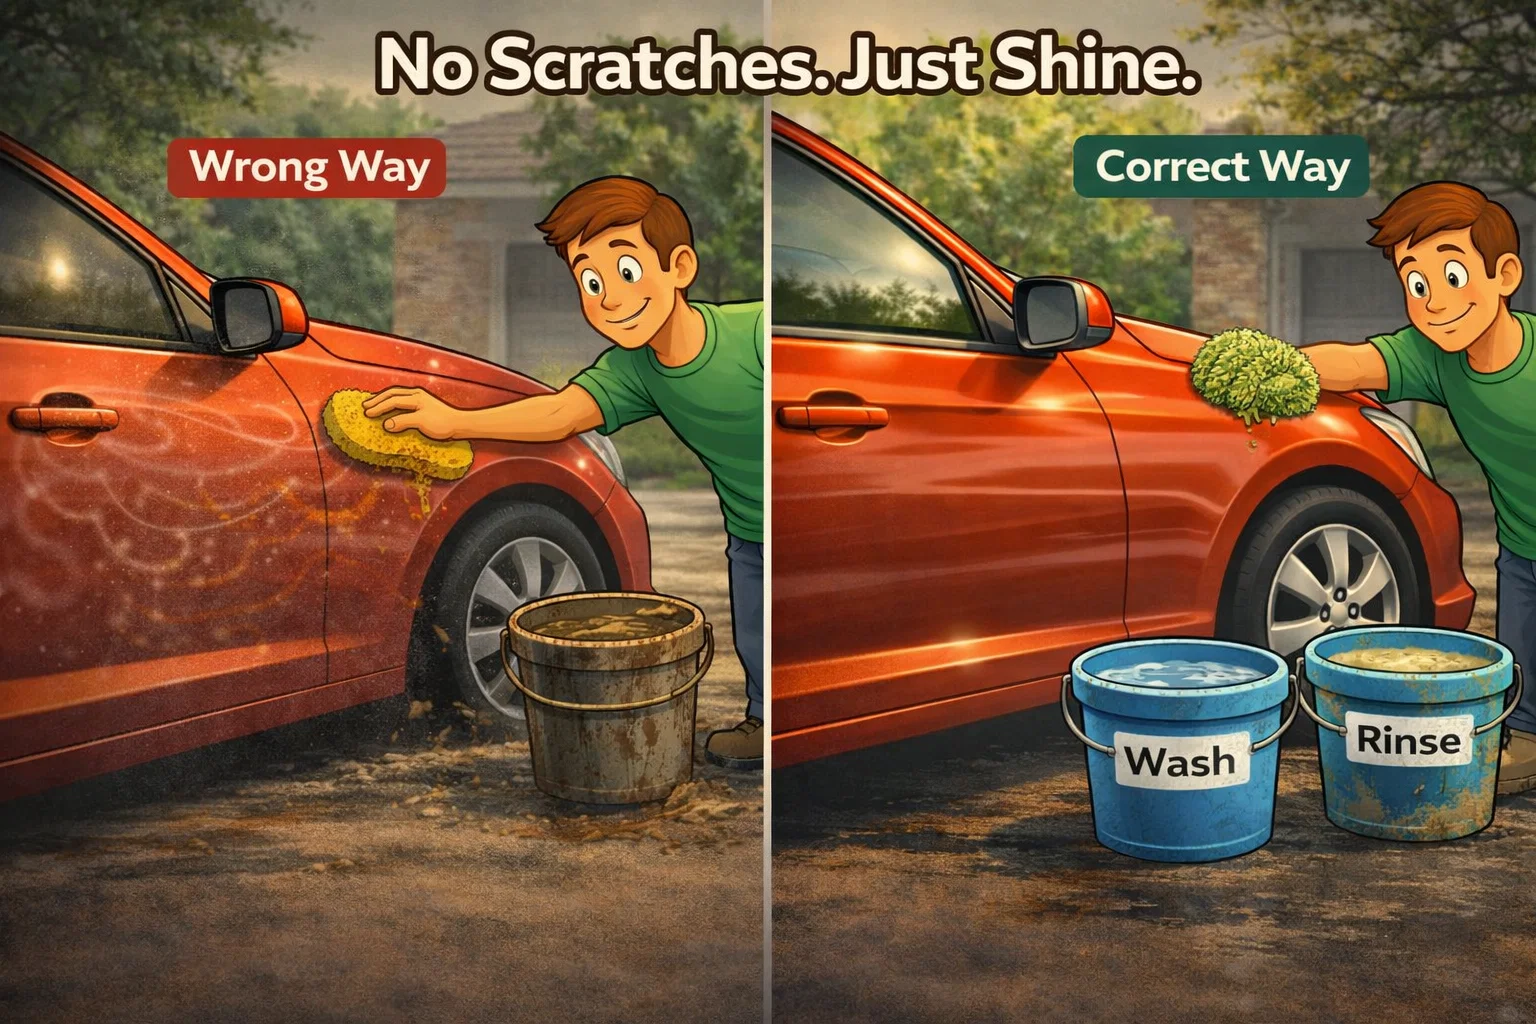
Use the two-bucket method: one bucket for soapy water, one for rinsing your mitt. Wash top to bottom, dry with a microfiber towel, then apply wax in thin, even coats. Total cost is under $20 in supplies. The process takes about 2 hours and provides 3 to 6 months of paint protection.
The $20 Detail That Protects Your $30,000 Investment
After months of road salt, grime, and winter grit, your car's paint is begging for attention. Spring is the single most important time to wash and wax your vehicle because the salt and chemical de-icers that kept roads safe all winter are actively eating through your clear coat right now.
A proper hand wash and wax takes about two hours and costs under $20 in supplies. A professional detail runs $150 to $300. The best part? With the right technique, your DIY results will match or beat what most quick-service car washes deliver, and your paint protection will last three to six months instead of three days.
This guide covers the two-bucket wash method that professionals use, the correct wax application technique, and the three mistakes that cause 90% of swirl marks and paint damage during washing.
Let's get that winter grime off and your paint protected before summer.
Washing your car with the two-bucket method and applying a coat of wax every three to six months protects your paint from UV damage, road salt, bird droppings, and tree sap. A proper wash and wax takes about two hours, costs under $20 in supplies, and can extend your paint's life by years. Always wash in the shade, use car-specific soap (never dish detergent), and work from top to bottom.
Why Washing Technique Matters More Than Products
Here is an uncomfortable truth: most people damage their car's paint every time they wash it. Automatic car washes with spinning brushes, dirty sponges, and circular wiping motions all create microscopic scratches called swirl marks. Over time, these swirl marks dull your paint and destroy the clear coat that protects the color underneath.
The right technique is more important than the most expensive soap or wax. A $5 bottle of car wash soap applied correctly will produce better results than a $50 product used improperly.
THE THREE CARDINAL SINS OF CAR WASHING
1. Using dish soap: Dish detergent strips wax, dries out rubber seals and trim, and accelerates clear coat degradation.
2. Washing in direct sunlight: Water and soap dry too quickly, leaving spots and streaks that etch into the paint.
3. Using a single bucket: You are just spreading dirty water back onto the paint, grinding grit into the surface with every pass.
What You Need (Total Cost: $15 to $40)
For Washing
- Two 5-gallon buckets
- Grit guards (for both buckets)
- Car wash soap (pH neutral)
- Microfiber wash mitt
- Microfiber drying towel (large)
- Wheel brush and wheel cleaner
- Garden hose with adjustable nozzle
For Waxing
- Car wax or sealant (paste, liquid, or spray)
- Foam applicator pads
- Clean microfiber buffing towels (2 to 3)
- Clay bar kit (optional, for deeper cleaning)
The Two-Bucket Wash Method: Step by Step
This is the method professional detailers use. One bucket holds soapy water, the other holds clean rinse water. After each pass on the car, you rinse the mitt in clean water before dipping it back into the soap bucket. This keeps grit and debris from going back onto your paint.
Pre-Rinse the Entire Vehicle
Use a strong stream from your hose to blast off loose dirt, mud, and debris. Pay special attention to wheel wells, the lower body panels, and the front grille where bugs and road grime accumulate. This step removes the abrasive particles that would scratch your paint during the wash.
Wash the Wheels First
Wheels are the dirtiest part of your car. Use a dedicated wheel brush and wheel cleaner (not the same mitt you will use on paint). Spray the cleaner, let it dwell for 30 to 60 seconds, then scrub each wheel and tire thoroughly. Rinse completely before moving to the body.
Cleaning wheels first prevents brake dust and grime from splashing onto freshly washed panels.
Wash Top to Bottom in Sections
Start at the roof and work your way down. The lower panels are always dirtiest, so saving them for last prevents contaminating your mitt early. Wash one panel at a time: dip the mitt in the soap bucket, make straight-line passes (never circular), then rinse the mitt in the clean water bucket before reloading with soap.
PRO TECHNIQUE
Use straight, overlapping passes from front to back. Circular motions create the swirl marks you see when sunlight hits a dark-colored car. Gravity and straight lines are your allies.
Final Rinse (Remove the Nozzle)
Remove the nozzle from your hose and let water sheet off the car in a smooth flow. This technique, called a sheeting rinse, causes water to slide off in flat sheets instead of forming beads, which dramatically reduces water spots and speeds up drying.
Dry with a Microfiber Towel
Never air-dry your car. Mineral deposits in water will etch into your paint as they evaporate. Use a large, clean microfiber drying towel and pat or blot the surface rather than dragging. Work from top to bottom, wringing out the towel frequently.
How to Apply Wax for Maximum Protection
Wax creates a sacrificial barrier between your paint and the elements. UV rays, bird droppings, tree sap, and acid rain attack the wax layer instead of your clear coat. Here is how to apply it properly:
Choose Your Wax Type
Paste wax: Thickest protection, hardest to apply, lasts 3 to 6 months. Best for enthusiasts.
Liquid wax: Good balance of protection and ease. Lasts 2 to 4 months.
Spray wax: Easiest to apply, least durable. Good for maintenance between full wax sessions. Lasts 2 to 4 weeks.
Apply in Thin, Even Layers
Work one panel at a time. Apply a thin layer of wax using a foam applicator pad with straight, overlapping strokes. Thin coats are easier to buff and provide better coverage than thick globs. More wax does not mean more protection.
Let It Haze and Buff Off
Wait until the wax hazes over (turns slightly cloudy), usually 5 to 15 minutes depending on temperature and product. Then buff it off with a clean, dry microfiber towel using light, straight-line strokes. Flip the towel frequently to avoid smearing.
Why Spring Is the Best Time for This
Road salt is corrosive. If your car has been exposed to salted roads all winter, the salt and chemical de-icers sitting on your paint and undercarriage are actively causing oxidation. A thorough spring wash removes these corrosive agents before they cause permanent damage.
Pairing a spring wash with wax protection sets your paint up for the heavy UV exposure of summer. For a complete seasonal maintenance approach, check out our spring car maintenance checklist and summer car prep guide.
Beyond Wax: Understanding Paint Protection
If you want longer-lasting protection, consider these options:
- Paint sealant: Synthetic polymer protection lasting 6 to 12 months. Applied like wax but more durable.
- Ceramic coating: Professional-grade protection lasting 2 to 5 years. Requires proper surface preparation.
- Paint protection film (PPF): Physical film applied to high-impact areas. Prevents rock chips and scratches.
For most car owners, a quality paste or liquid wax applied every three to four months provides excellent protection at a fraction of the cost. If your paint has existing scratches, check our scratch removal guide before waxing, and our headlight restoration guide while you are at it.
BOTTOM LINE
A proper two-bucket wash and wax costs under $20 in supplies, takes about two hours, and protects your paint for months. Do it every spring to remove winter salt damage, and every three to four months after that. Your car's resale value and appearance will thank you.
Frequently Asked Questions
Don't Miss Critical Car Care Tips
Get exclusive guides, money-saving maintenance tips, and early warning signs delivered straight to your inbox.